
GLOBE TROT
— an international crowd-sourced dance-film project —
Film: Mitchell Rose Dance: Bebe Miller
Film a non-dancer performing two seconds of Bebe’s choreography
and then send their footage to Mitchell
Deadline for submitting footage is July 19th.
See manual below for full instructions.
Globe Trot Manual
► Overview
Bebe Miller has choreographed a 2:10 dance. Filmmakers around the world will find non-dancers, asking them to learn two seconds of the choreography. Most people can learn two seconds of even complicated dance steps.
All the footage of these short segments of choreography is sent back to me (Mitchell Rose) who edits it together into a seamless whole.
This test video will give you a rough idea of the effect:
What I like about this is seeing non-dancers performing sophisticated choreography, a bit awkwardly… but trying their best. And there’s a sense of unity in it — of the democratization of dance.
What I’m asking of you, my global collaborators, is to send me:
• A few shots of different people doing the 4 counts you’ll be assigned to cover.
• And possibly an opening image. (More on that later.)
And I want to maintain this artistic standard:
• An accurate performance of the choreography.
• Photographed with the performer in an exact placement in the frame so that it lines up perfectly with the adjacent shots.
• Performed by an interesting person before an interesting background.
So I ask you to read through the entirety of this manual. I apologize for its length, but there’s precise information in here that you have to know to do this successfully. If the shots don’t match up, the film doesn’t work.
And again, thank you so much joining us in this challenge. It’s going to be an exciting process.
► Project Timeline
Shoot whenever you like, but I’d like to get all the footage by July 19.
► You: Filmmaker and/or Dancer
This project requires someone with an intermediate skill level of filmmaking, AND someone who can learn the choreography, understand its subtleties, and teach it clearly. Maybe that’s two people, or maybe that’s just you — if you’re a filmmaker who’s been involved in dance, and can learn and teach choreography in a very precise way, then maybe you can do this by yourself.
► Equipment
Camera
Most HD camcorders should be OK. The Quicktime movie you’ll send me will be:
• 1080P (1920 X 1080)
• Progressive frames (not interlaced) You’re looking for a “P” in your camera settings: 1080P or 24P… somewhere a “P” that means Progressive. You do not want to see an “i” like 1080i or 50i which means interlaced.
• Apple ProRes format (ideally — if you can’t do that, we’ll discuss)
• 24FPS
What about DSLRs? It all depends on the lens. We need depth of field. If your lens will allow the subject and the background to be in focus, then it’s OK.
What about a GoPro? Too wide-angled.
Focal Length
Shoot in a wide angle. My Canon, at its widest, has the 35mm equivalent of 30.4mm. That’s ideal — it would be great if your camera had a similar focal length. Don’t zoom in to compose your shot; move the camera forward.
Frame Rate
I will edit the project in 24FPS. If your camera shoots 24FPS, use that. If it only shoots 30FPS or 25FPS, I’ll convert it to 24FPS.
Tripod
Shooting with a tripod would give you a nice sharp image, but if you can shoot very still handheld, that would be OK.
The camera should be at about your hip height.
► The Dance
Here is a “Learning the Steps” video that will teach you the choreography. (Click the Full-Screen icon in the lower-right to see it bigger.)
I’ll be sending you four-count phrases of the dance to shoot. So if you’ve been assigned 6.2 that means you’re responsible for Measure 6, Counts 2, 3, 4, 5.
It’s good to know what comes before and after the phrase so you can get the dancing to not begin/end with a static dead-stop. But don’t teach more than those four counts.
Part of the wonder of this piece is seeing non-dancers dancing in a sophisticated way. It’s very important that you communicate the detail of the choreography to the performer and get all the accuracy you can out of them. This is what will make the piece amazing.
So take the time to work with your performer to make sure they’re getting it as accurately as possible.
Tempo
I’ll send you a “Tempo Track” to get the tempo. The dancer doesn’t need to perform it to music playback. You can check it on your iPod and then give them the tempo.
► Framing
It’s crucial — CRUCIAL — that all of our shots align perfectly in editing. If the placement of the dancer in the frame does not match up with the placement in the adjacent clips, it won’t work.
Subject Size
The performer should occupy 40% of the height of the frame:
The size of all performers in the frame is always the same — in every clip throughout the movie.
When your dancer is moving front or back, judge Size based on where they are on counts 2 and 3.
Important: If you’ve been assigned measures 19, 20, or 21 you have special instructions for your shot size. I’ll get to that later.
Watch the “Framing the Shot” video to understand size:
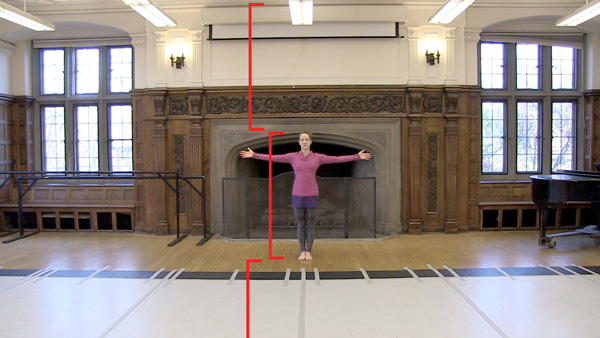
Vertical Placement
On my camera’s viewfinder, I can turn on grid marks on the thirds. When I frame shots, I put the chest in the center and the knees on the lower third line.
• First priority is to get the chest at center height.
• Next priority is to get the knees at the 1/3 mark. When you do those two things, your performer will be the right size — 40% the height of the frame.
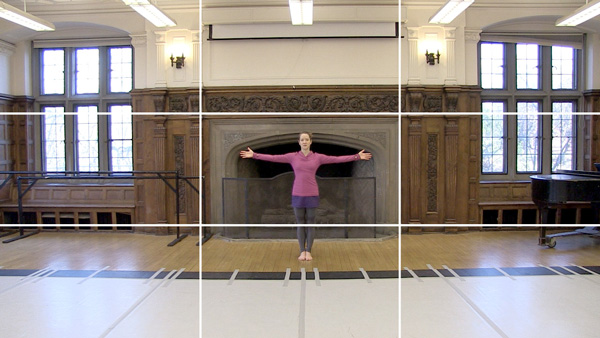
Horizontal Placement
I’m sending a Positioning Spreadsheet that shows where the performer should be horizontally in the frame. There are nine possible horizontal positions. Position 5 is the center of the frame. 1 & 9 are a little bit in from the sides (almost one number width).
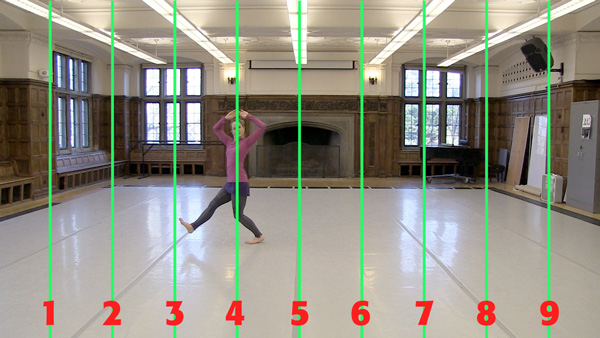
Dancer at 4
► Locations
Background is crucial, so try to find visually interesting locations. We want to capture some of the spirit of your nation/place with your location. So if you were in an Italian village, it would be great to shoot in a medieval city plaza. In Japan, somewhere with traditional Shinto architecture in the background — it says “Japan” in an instant.
It would be wonderful if we could get some iconic imagery in the background. If you’re in New York City, try to get the Statue of Liberty. Paris, the Eiffel Tower…
But a few ironic backgrounds might be interesting — an industrial wasteland, a train yard, etc.
We could even have a few novelty shots in there: a snow shot, or something else you think would interesting and unusual.
When envisioning possible locations, remember that with our framing, the camera can’t tilt up, so will what you imagine fit in the frame? If you choose the Eiffel Tower you might have to be a mile away from it for it to fit in. You may envision a gorgeous cathedral but if too close to it, you’ll only see the stairs.
The Space
Wherever you’re shooting, we want to maintain a sense of the depth. If the dancer is within 10 feet of a wall or building, it’s going to look flat. So have enough space around the dancer so that it appears the entire dance could be performed there. And so of course it should be on the ground — no stairs, tops of walls, etc.
Do we want other people in the shot? If occasionally there’s a shot with pedestrians walking in the area, I don’t see anything wrong with that. It will make it look real. But keep the frame pretty simple — if it’s too busy it will confuse the eye.
► The Dancers
We want people to perform the choreography well… but not too well. We want this to look like non-dancers, presumably just found in the street.
There are two ways you can get your performers: people you know and people you don’t.
If you use people you know, that’s fine. If you just want to find somebody in the location you choose, that’s exciting! Just make sure they’re willing to give you 10 minutes of their time to really learn the choreography.
But for our cast, we want a wonderful variety.
There might be a tendency when looking for your performer to get healthy athletic-looking young people that you think can perform the dance phrase beautifully. And that’s fine. But overall we want all types — ages, sizes, races.
To help make sure that we get a few older people in there, and some body types that seem improbable for dancing, we’re identifying some easier moments in the dance and when we send out the phrase assignments will ask some filmmakers to shoot their phrase with one of these “improbable” people types.
We should probably stay away from children, or anyone who is extremely short — merely because visually it won’t match very well.
Clothing
In the same way it’s great to have your background give a quick visual clue to what country you’re in, the clothing might be able to help with this, too. A sari in India, etc.
► Variety of Shots
To guarantee that we get a good variety in the film, please shoot three or four clips of your 4-count phrase with different locations and different people. Variety will give me choices in editing.
Of these three or four takes, I’ll use the two that cut into the project the best: counts 1 and 2 from one clip, and counts 3 and 4 from the other clip.

Each filmmaker has two segments next to each other. If you give me JOHN AT THE EIFFEL TOWER DOING PHRASE B and MARY AT THE EIFFEL TOWER DOING PHRASE B, there won’t be any change across the cut and it will look bad. That’s why you should shoot the same phrase at different locations.
Let’s say I’ve given you two phrases to shoot. If you want, you could shoot some shots of each phrase at the same location since those two phrases won’t be next to each other in editing.
Location 1: shoot person #1 doing the phrase A; person #2 doing phrase B
Location 2: shoot person #3 doing the phrase A; person #4 doing phrase B
Location 3: shoot person #5 doing the phrase A; person #6 doing phrase B
I would just suggest that if you do it this way, shooting Phrase A and Phrase B at Location 1, change them slightly so when the viewer sees Phrase B he doesn’t think, “I’ve seen that before.” Just move the camera to a slightly different place or face a different direction.
► For Everyone: A Special Note About the Beginning
As I said in the Locations section, it will be great to have some iconic backgrounds. But this is especially true in the very beginning of the piece, when the performers are just standing there for 10 seconds.
So if you live near one of these amazing iconic images — a Statue of Liberty or an Eiffel Tower — or have some other background in mind that you think would be an amazing opening image, then besides the regular dance phrase you’ve been assigned, could you also please shoot the very first four counts in which the person just stands there at Position 6 before the dancing starts. (I’m not assigning these opening counts to anyone — I’m just relying on volunteers.)
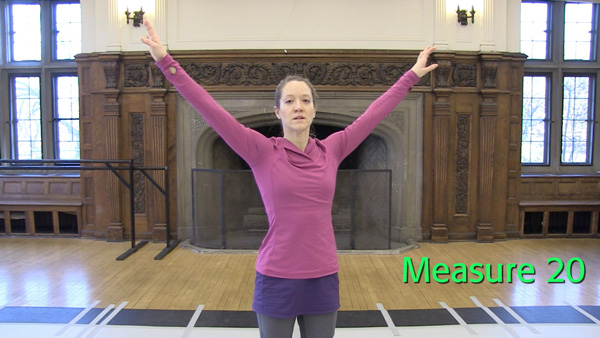
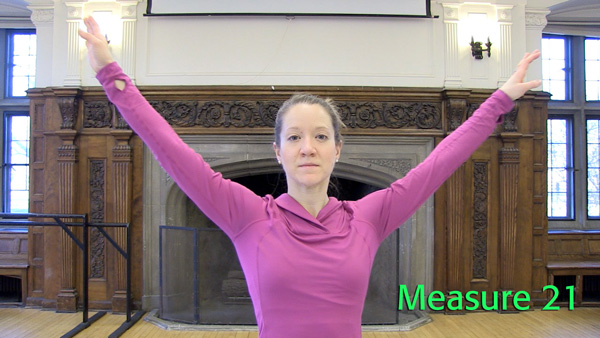
► Measures 19, 20, & 21
As I said above, all performers are always the same size throughout the movie. But these last three measures are different. If you’ve been assigned one of them, take note on the “Framing the Shot” video (above or here) of how these shots are composed.
Measure 19 I’ll send you special instructions on this measure. Start with them at the normal size, as described previously. But then let them do the entire 8 counts with the camera remaining stationary and them running away from you.
Measure 20 Shoot the entire 8 counts of the subject rotating in a medium shot, with the bottom of the frame at mid-thigh, and the base of the neck center frame. These are close-ups; make sure the person’s face is natural and relaxed.
The height of the camera in this case is chest high.
Measure 21 Shoot the entire 8 counts of the subject rotating in a close shot, with the bellybutton at the bottom of the frame, and the nose at center frame. These are close-ups; make sure the person’s face is natural and relaxed.
The height of the camera in this case is eye-level.
► Releases
Make sure you have the performers sign a release form. We don’t want some crazy person shutting down the project months from now.
You’ll scan these releases and send me a PDF of them. (Or mail them.) Please name each release with the same clip naming method as described below. So the release for the clip example below will be named “11.2.57.5_release.pdf”
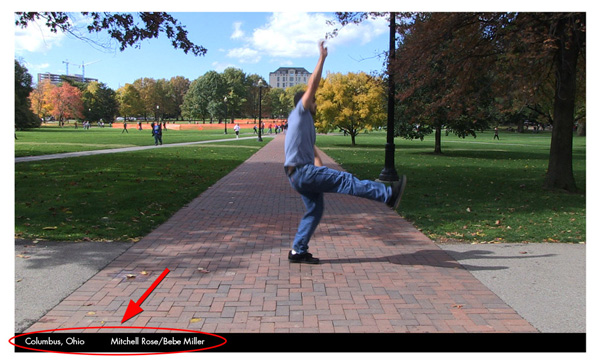
On the release, make sure you put what city/country it was shot in because I’ll put in the corner of the video where each shot took place and who the filmmaker(s) were. Like this:
► Logging/Exporting the Clips
With thousands of shots, every one has to be named properly so I can find them. Let’s use this method for naming shots:
11.2.57.5.mov
11 = Your 4-count phrase starts with Measure 11
2 = Your 4-count phrase starts on Count 2
57 = The Filmmaker Number you were given
5 = Performer 5 (You did five shots of your phrase with five people — this gives them a unique number.)
Please trim your clips and only export the precise 4 counts of the choreography. (I don’t need extra gigabytes of unusable footage.) Watch the “Clip Export Example” video:
You’re going to send me clips that are:
• 1080P (1920 X 1080)
• Progressive frames (not interlaced)
• Apple ProRes format (ideally — if you can’t do that, we’ll discuss)
• 24FPS (if possible; see Frame Rate section above)
• Include the ambient audio recorded
The URL of where to upload your clips will be in the email I send with your phrase assignment.
► Summary/Checklist
• Learn your four counts of choreography well.
• Get a great location that is spacious and has an interesting background.
• Get a great volunteer and spend the time to get them to dance the four counts well.
• Make sure the tempo is right.
• Set the camera to 1080P, 24FPS
• Have the camera be at your hip height.
• On wide-angle, position the camera so the performer’s chest is at the center, their knees at the lower 1/3 mark. (This makes them occupy 40% the height of the frame.)
• Position the performer on the correct horizontal position marks based on the Position Spreadsheet (favoring where they are on counts 2 & 3 of their four count phrase).
• Get the shot!
• Have the performer sign a release.
• Get the shot again with a few more people and a few more locations.
• Also shoot the very beginning of the piece where they just stand there on Position 6, if you have a spectacular background.
• Capture the clips and trim them to just the 4 counts.
• Export them as Apple ProRes LT (if possible; otherwise we’ll discuss).
• Name them with the naming method described above.
• Upload the clips. And send the releases.
• Wait a few months, and then celebrate your genius!
THANK YOU for your patience in reading through all this. There was a lot of information there. If you have any questions at all, it’s fine — feel free to email me.
OK, everybody — let’s DO IT!!!